In this blog, We will be posting helpful laptop key installation guides for various Acer, Asus, Dell, Gateway, HP, IBM, Sony, and Toshiba Laptops. We also will be taking requests for different models, leave your model request in the comment sections.
Just follow the simple steps in this laptop key installation guide, and we will show you how to install your replacement laptop key back on the keyboard.
Sunday, December 13, 2009
How To Install Laptop Keyboard Keys
Laptop Keyboard Key Install Guide
Did your kids pulled couple of keys of your work laptop? or Did your cat steal them? These are just two of the common causes of the missing key syndrome, but we are here to help.
Laptop keyboard key caps, and retainers clips often go missing, or break for one reason or another. The usual call to tech support when you have a missing key often ends up with them wanting you to send the laptop off for couple of weeks, and charging you upwards of $150 for a new keyboard. Manufactures do not sell replacement laptop keys.
If all you need is couple of keys, there is no need to buy a new keyboard, no need go through the hassle taking the laptop apart, just follow the simple steps in our laptop key installation guides. We will show you how to install your laptop key back on the keyboard.
In this blog, We will be posting laptop keyboard key installation guides for various Acer, Asus, Dell, Gateway, HP, IBM, Sony, and Toshiba Laptops. We will also be taking requests for different models, Please leave your model request in the comment sections, include your laptop model number and what key you have missing.
In this install guide, we are showing you how to remove the original laptop key, and retainer clip, and then back on again. You can skip ahead to step 4 if all you doing is installing the retainer clip.
As always, please make sure the laptop is turned off before you attempt any kind of repair.
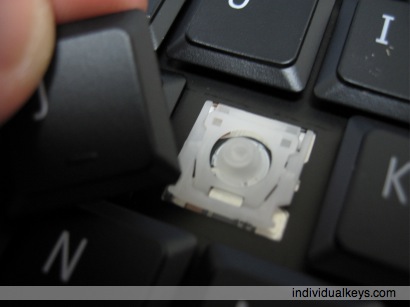
STEP 1. Replacing the worn keyboard key cap.
Most laptop retainer clips have 3 to 4 clip points. Often 2 on top and 1 on the bottom, or 2 on top, and 2 on the bottom. You can do this with a flat heat screwdriver or your finger tip. Start by lifting up the key at each corner until you feel the key cap has un-clip itself from the key retainer clip.
STEP 2. Apply the same method to the other corner. Pulling the keys from the corners have a lesser chance of breaking the plastic retainer clips under the key.
The laptop key is removed.
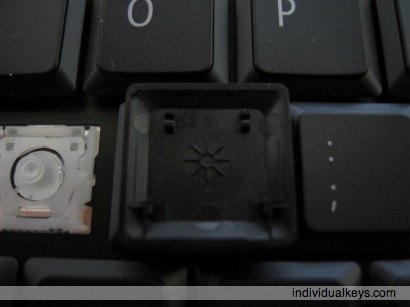
Inspect the back of the laptop key, and make sure all the clip points are still intact, if the clips are broken it will not stay on the retainer clip. This one looks good.
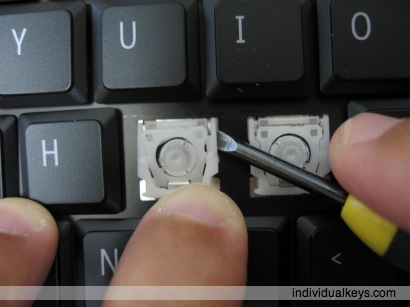
STEP 3. Removing the laptop key retainer.
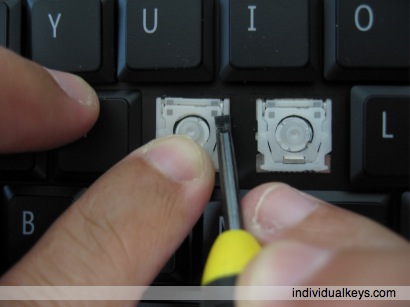
Here is where a flat head screwdriver will be handy. The retainer clip is currently being held in place by the metal tabs from the bottom of the keyboard. To remove the key retainer, first place the flat head screwdriver underneath the retainer as shown in the picture, with my finger I am applying light pressure to the retainer making it easier to lift with the screwdriver.
Once you have the right corner loose, you can just unhook it from the metal clips, do so by unhooking it at the bottom, and top left metal clip.
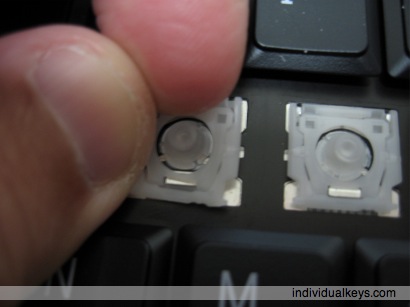
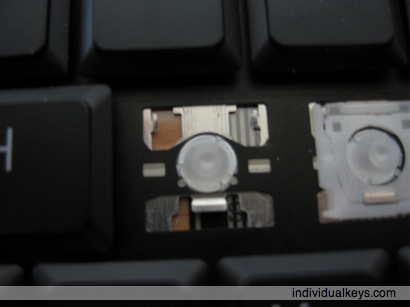
Here is a picture of keyboard without the retainer clip, showing you the 3 metal prongs and "suspension" clear rubber nipple.
STEP 4. Installing the laptop key retainer.
IMPORTANT!
We are assuming you bought the replacement laptop key from us individualkeys.com, if you did not, please take a minute to inspect the retainer clip and the back of the key BEFORE you begin to install it.
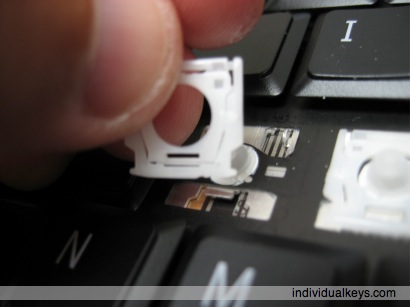
Start by holding the retainer with the correct side up, or as shown in the picture below.
Now loop the horizontal opening at the bottom of the retainer clip around the metal prong, once you do that your retainer should be laying nice and flat as shown below.
The retainer now has to be lock into place, start by applying pressure with your finger pushing upwards, while pushing down the right corner until the retainer locks to the metal prong.
Now repeat for the left side.
Great, your almost done, now we just need to install the key cap.
STEP 5. Installing the key cap.
Align the key cap directly over the hinge, and equal spacing around the surrounding keys. Push down on the key cap until it snaps into the retainer.
If it does not snap right in, you may need to work one corner at a time, start with the top corner and then the bottom.