Replacement Laptop Key - Install Guide #1 - Retainer Type HC28
DELL Studio 15 1535 1536 1537 1555 Replacement Laptop Key
Install Guide
In this install guide, we are showing you how to remove the original
laptop key, and retainer clip, and then back on again. You can skip
ahead to step 4 if all you doing is installing the retainer clip.
As always, please make sure the laptop is turned off before you attempt
any kind of repair.
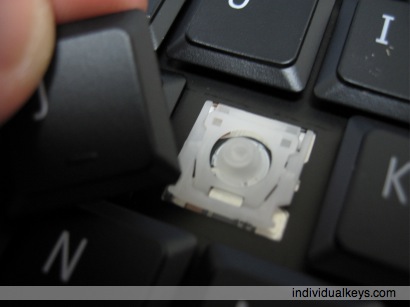
STEP 1. Replacing the worn keyboard key cap.
Most laptop retainer clips have 3 to 4 clip points. Often 2 on top
and 1 on the bottom, or 2 on top, and 2 on the bottom. You can
do this with a flat heat screwdriver or your finger tip. Start by lifting
up the key at each corner until you feel the key cap has un-clip itself
from the key retainer clip.

STEP 2. Apply the same method to the other corner. Pulling the keys
from the corners have a lesser chance of breaking the plastic retainer
clips under the key.

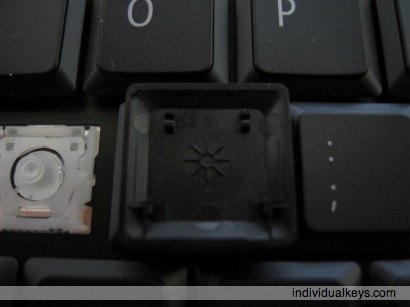
The laptop key is removed.
Inspect the back of the laptop key, and make sure all the clip points
are still intact, if the clips are broken it will not stay on the retainer
clip. This one looks good.
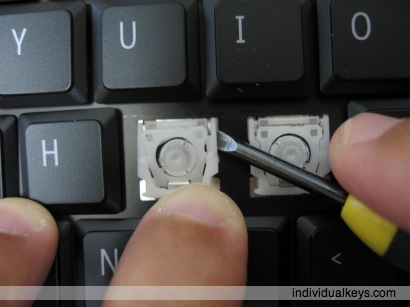
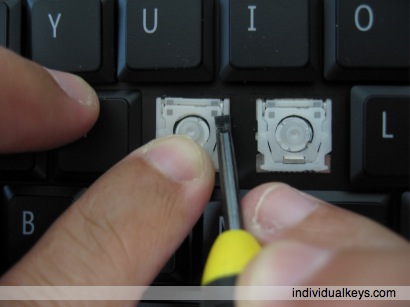
STEP 3. Removing the laptop key retainer.
Here is where a flat head screwdriver will be handy. The retainer clip
is currently being held in place by the metal tabs from the bottom of
the keyboard. To remove the key retainer, first place the flat head
screwdriver underneath the retainer as shown in the picture, with my
finger I am applying light pressure to the retainer making it easier to
lift with the screwdriver.
Once you have the right corner loose, you can just unhook it from the
metal clips, do so by unhooking it at the bottom, and top left metal clip.
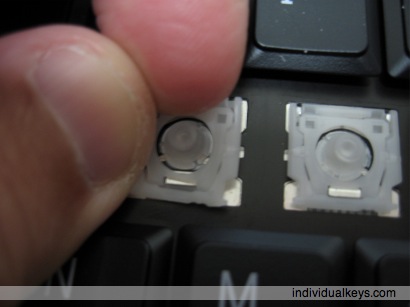
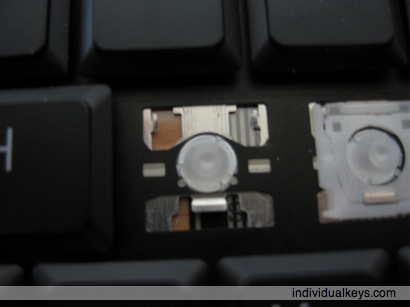
Here is a picture of keyboard without the retainer clip, showing you
the 3 metal prongs and "suspension" clear rubber nipple.
STEP 4. Installing the laptop key retainer.
IMPORTANT!
We are assuming you bought the replacement laptop key from us
individualkeys.com, if you did not, please take a minute to
inspect the retainer clip and the back of the key BEFORE you begin
to install it.
Start by holding the retainer with the correct side up, or as shown
in the picture below.
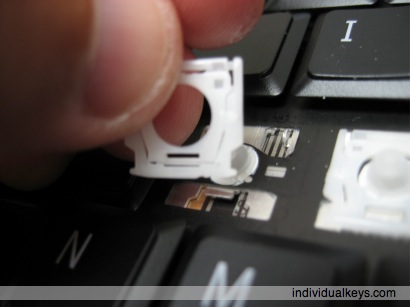
Now loop the horizontal opening at the bottom of the retainer clip
around the metal prong, once you do that your retainer should be
laying nice and flat as shown below.

The retainer now has to be lock into place, start by applying pressure
with your finger pushing upwards, while pushing down the right
corner until the retainer locks to the metal prong.
Now repeat for the left side.

Great, your almost done, now we just need to install the key cap.
STEP 5. Installing the key cap.
Align the key cap directly over the hinge, and equal spacing around
the surrounding keys. Push down on the key cap until it snaps into
the retainer.
If it does not snap right in, you may need to work one corner at a
time, start with the top corner and then the bottom.

That's it, your done, Good Job! Thank you.
Install Guide
In this install guide, we are showing you how to remove the original
laptop key, and retainer clip, and then back on again. You can skip
ahead to step 4 if all you doing is installing the retainer clip.
As always, please make sure the laptop is turned off before you attempt
any kind of repair.
STEP 1. Replacing the worn keyboard key cap.
Most laptop retainer clips have 3 to 4 clip points. Often 2 on top
and 1 on the bottom, or 2 on top, and 2 on the bottom. You can
do this with a flat heat screwdriver or your finger tip. Start by lifting
up the key at each corner until you feel the key cap has un-clip itself
from the key retainer clip.
STEP 2. Apply the same method to the other corner. Pulling the keys
from the corners have a lesser chance of breaking the plastic retainer
clips under the key.
The laptop key is removed.
Inspect the back of the laptop key, and make sure all the clip points
are still intact, if the clips are broken it will not stay on the retainer
clip. This one looks good.
STEP 3. Removing the laptop key retainer.
Here is where a flat head screwdriver will be handy. The retainer clip
is currently being held in place by the metal tabs from the bottom of
the keyboard. To remove the key retainer, first place the flat head
screwdriver underneath the retainer as shown in the picture, with my
finger I am applying light pressure to the retainer making it easier to
lift with the screwdriver.
Once you have the right corner loose, you can just unhook it from the
metal clips, do so by unhooking it at the bottom, and top left metal clip.
Here is a picture of keyboard without the retainer clip, showing you
the 3 metal prongs and "suspension" clear rubber nipple.
STEP 4. Installing the laptop key retainer.
IMPORTANT!
We are assuming you bought the replacement laptop key from us
individualkeys.com, if you did not, please take a minute to
inspect the retainer clip and the back of the key BEFORE you begin
to install it.
Start by holding the retainer with the correct side up, or as shown
in the picture below.
Now loop the horizontal opening at the bottom of the retainer clip
around the metal prong, once you do that your retainer should be
laying nice and flat as shown below.
The retainer now has to be lock into place, start by applying pressure
with your finger pushing upwards, while pushing down the right
corner until the retainer locks to the metal prong.
Now repeat for the left side.
Great, your almost done, now we just need to install the key cap.
STEP 5. Installing the key cap.
Align the key cap directly over the hinge, and equal spacing around
the surrounding keys. Push down on the key cap until it snaps into
the retainer.
If it does not snap right in, you may need to work one corner at a
time, start with the top corner and then the bottom.
That's it, your done, Good Job! Thank you.
Labels: DELL Studio 15 1535 1536 1537 1555 Replacement Laptop Key Install Guide
posted by Laptop Keyboard Keys at
4:37 PM
![]()
![]()


23 Comments:
thank you for this VERY detailed guide, my F Key is finally backed on.
Thank you for taking the time and posting this info, you have helped me fix my laptop key :)
What about the control key? It is different in that it has a u shaped wire and it won't just press in place.
I will update the one for the control key in a few days, but you want to make sure the key retainer is installed first, then you want to insert the U shape wire through the metal opening on the keyboard, once you do that, you can push directly down on the key and it should snap back on. Hope this helps.
Hello! I received your key and cannot get it on! Was going to send my laptop in to HP until I got the email about this blog. Could you please post how to install the Backspace key and a Compaq Presario CQ60? Thank you!
James & Individualkeys.com Gang.
Thanx for the key. I had a friend of mine install the new key U mailed to me. As installing keys is not my forte. I really appreciate the fact that U sell individual keys.
Happy Holidays and a Happy New Year to Everyone.
Sara
I was very happy to find a place that sells individual laptop keys, and happier still with the prompt delivery and customer service of your company. It's nice that you always answered the phone right away (I never got voicemail), and that you sent a replacement piece for the damaged one so quickly. I placed my original order Monday and had my keyboard completely fixed by Wednesday! Remarkable!
Karen (Gateway M-7301u)
Thanks for the keys and the guide. And for you substituting the right clips, great service!Ivo, NL
Thank you so much for this key install guide!!! it helped me so much!! it helped me take off and put back on my enter key..
Anyone have advice on replacing SPACEBAR key on an Asus Eee PC 1000?
Thank you so much for the key and the guide! Replaced my shift key without any problems! :)
Thanks so much for the key and the guide! Replacing my key was a piece of cake! ;-)
I need a install guide for sony vaio VGN-Fe870E laptop.
You make no mention of the rubber boot in this guide. The rubber boot is missing on my laptop as well as the key. I believe that the rubber boot is included, is it not? I have not received shipment yet so I don't know.
Sorry, I forgot to mention the brand and model. It is Gateway MX6445. Thanks for your service.
Your guide is very useful. Most computer repair centers refuse to do such repairs and insist on replacing the keyboard.
wow nice information!
Laptop Service in Chennai
Keypad problems and display problems are very frequent issues in laptop. Thanks for sharing your valuable input with us. Good to read. . HP Laptop Service centers in Chennai
Keypad issues are very common. And also display and hinges of the laptop is common issue. Good explanation. I enjoyed the way it was explained. Thanks.
Thanks for the tips. Laptops are very difficult when compared to PC but once you gain experience it will be easy .
This is a good way to learn. Keep posting more on otherlaptop issue repairing. Laptops are different from desktops but not difficult as it seems.
Thanks for the details. Good to learn through reading. Keep writing more on other laptop issues.
Thanks for the details. Good to learn through reading. Keep writing more on other laptop issues.
Post a Comment
Subscribe to Post Comments [Atom]
<< Home